Short Version - Videos
Step 1: Sign Up and Prepare Your Account
Step 2: Creating and Running Your First Project
Step 3: Reviewing and Re-running Projects
Long Version Guide
Welcome to Personize.ai! This guide will walk you through setting up and running your first project, helping you get started quickly and effectively.
Welcome to part one of the Personize Studio tutorial.
Step 1: Sign Up and Prepare Your Account
After creating a Personize.ai account, follow the steps below to prepare your account for your first project:
1. Creating Environment Variables:
Note: AI Agents inside Personize Studio require inputs to generate personalized content. You can map your data schema columns to these inputs or choose from predefined variables in your account. For example, to generate emails, you need to provide your name as the sender to the Email Writer Agent. You can do this by creating a variable called "My Name" with your name as its value and using it in your Email Generation workflow.
Depending on the nature of your variable, you can choose to define it as a General or Secret environment variable. For instance, if one Agent requires an API Key or Password, it's advisable to use a secret variable to ensure the security of sensitive information.
To create variables, follow these instructions:
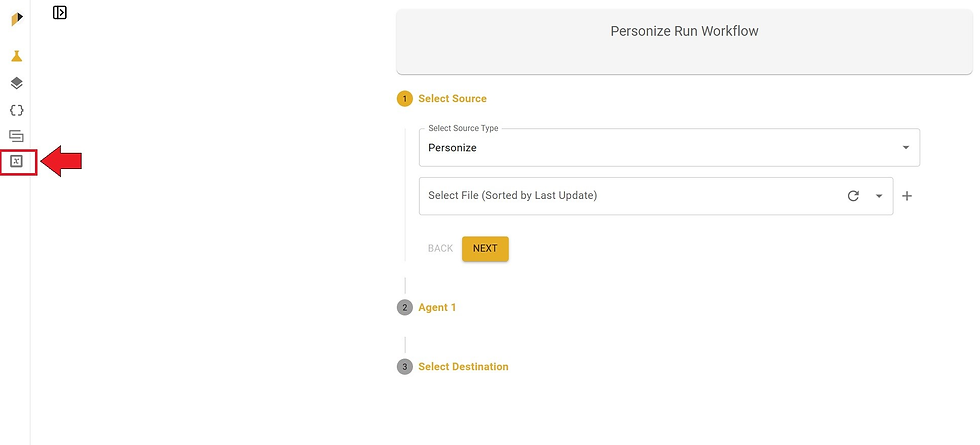
Go to the Environment Variables section from the left side bar and click on the "Add Variable" button:
Enter a name for your variable, such as "My Name" or "My Company," in the "Variable Name" section and input the corresponding value in the "Variable Text" section:
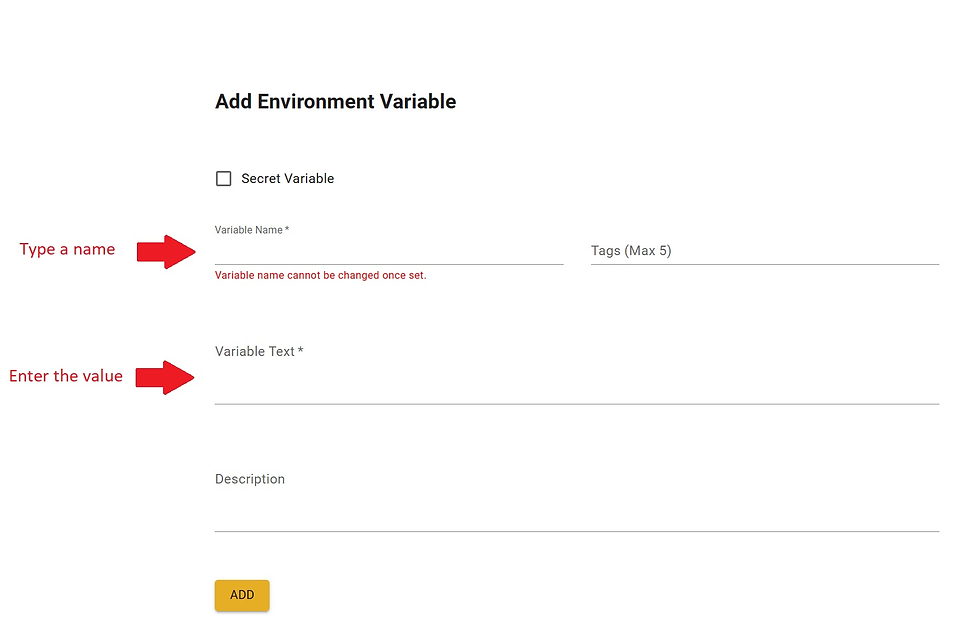
For a project like generating emails for your campaign, you may need the following variables:
Pitch: This is your main value proposition or offer.
[sender]'s First Name: e.g., "John-First Name".
[sender]'s Title: Include your title.
[sender]'s Company Name: Add your company name.
2. Setting up Your Open AI API Key:
By integrating your OpenAI account with Personize, you can leverage advanced AI models to enhance your data processing and content generation tasks.
Follow these steps to set up your OpenAI API key inside Personize Studio:
Create an Open AI API Key:
Note: If you already have an OpenAI API key, skip this step.
Login to the Open AI platform at this link: https://platform.openai.com/.
Navigate to Settings and then to the API Keys section.
Click on "Create new secret key" and then "Copy" to save it.
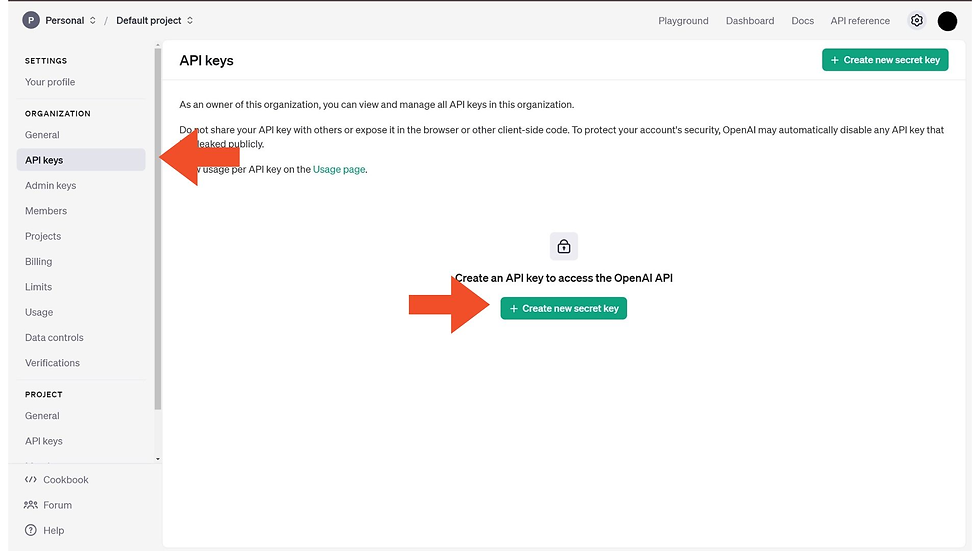
Return to Personize Studio, go to the Profile section, click on the OpenAI logo, paste your API Key, and click Save.

For more information on using OpenAI as your provider during the run process, refer to this document: https://doc.clickup.com/2397574/d/h/295c6-28157/3b82aa8010fb5ae/295c6-40417
You have successfully prepared your account to run projects inside Personize Studio!
Step 2: Creating and Running Your First Project
Now it's time to run your first project. Here, we’ll walk through setting up an email campaign that generates personalized emails based on your leads' company information.
Let's get started:
1. Upload your data:
Bring your data into Personize by uploading a CSV file from your computer or by selecting a file from your Google Sheets or HubSpot account. For this project, ensure your data includes lead information, such as their name, company name, and company domain.
To upload a file from your computer:
Click on the "+" button to upload a new CSV file (e.g., a lead list from Apollo.io):
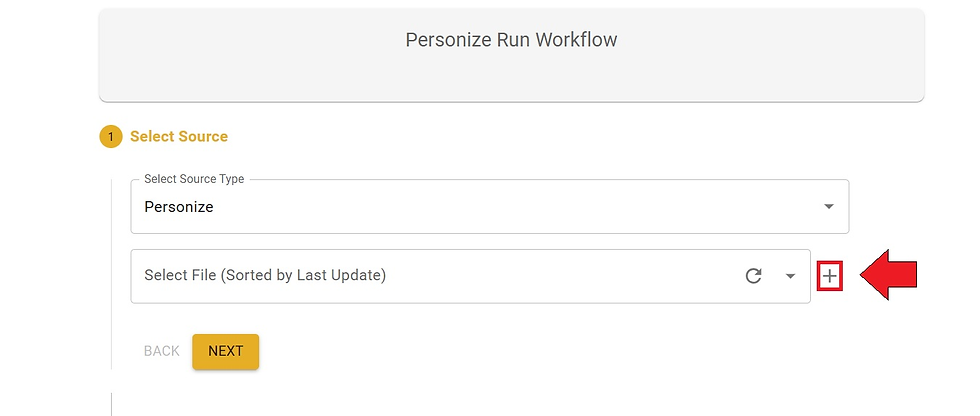
Select the uploaded file from the list and specify the range you want to apply:
Note: For the first test, it’s best to select just the first row. In subsequent runs, you can increase the number of rows.

For more information on Data Sources inside Personize Studio, refer to these documents:
Personize Data Source:
Google Sheets Data Source:
HubSpot Data Source:
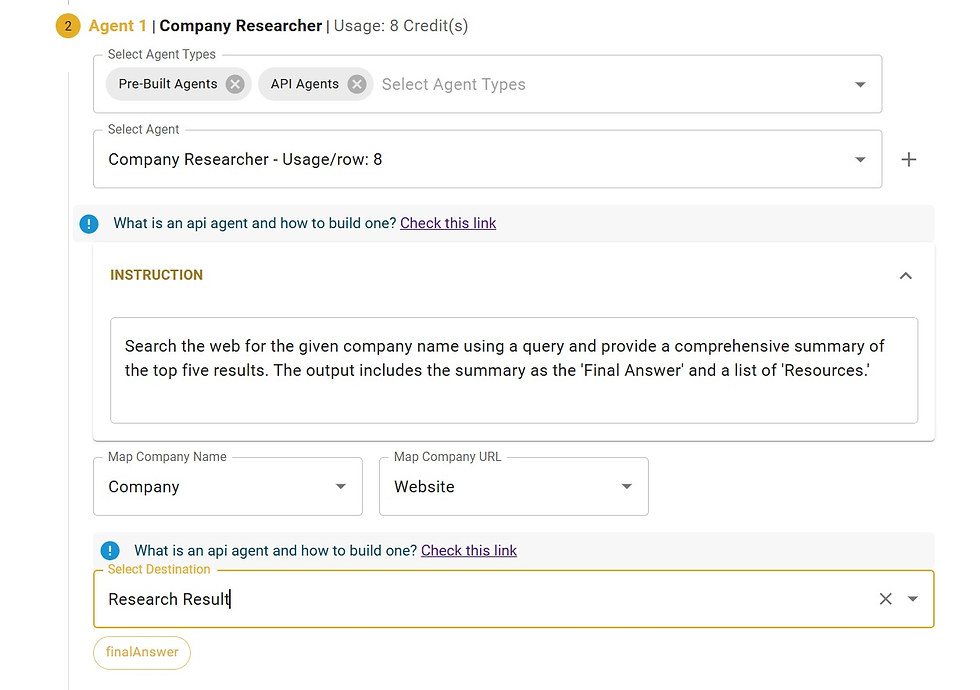
Select the First Agent - "Company Researcher":
From the list of Agents, select "Company Researcher." This agent will search the web for the specified company name and provide a comprehensive summary. Map the columns in your data to the required inputs, which are "Company Name" and "Company Domain."
In the destination drop-down, select "Add a column" and name it "Research Results" to store research findings:
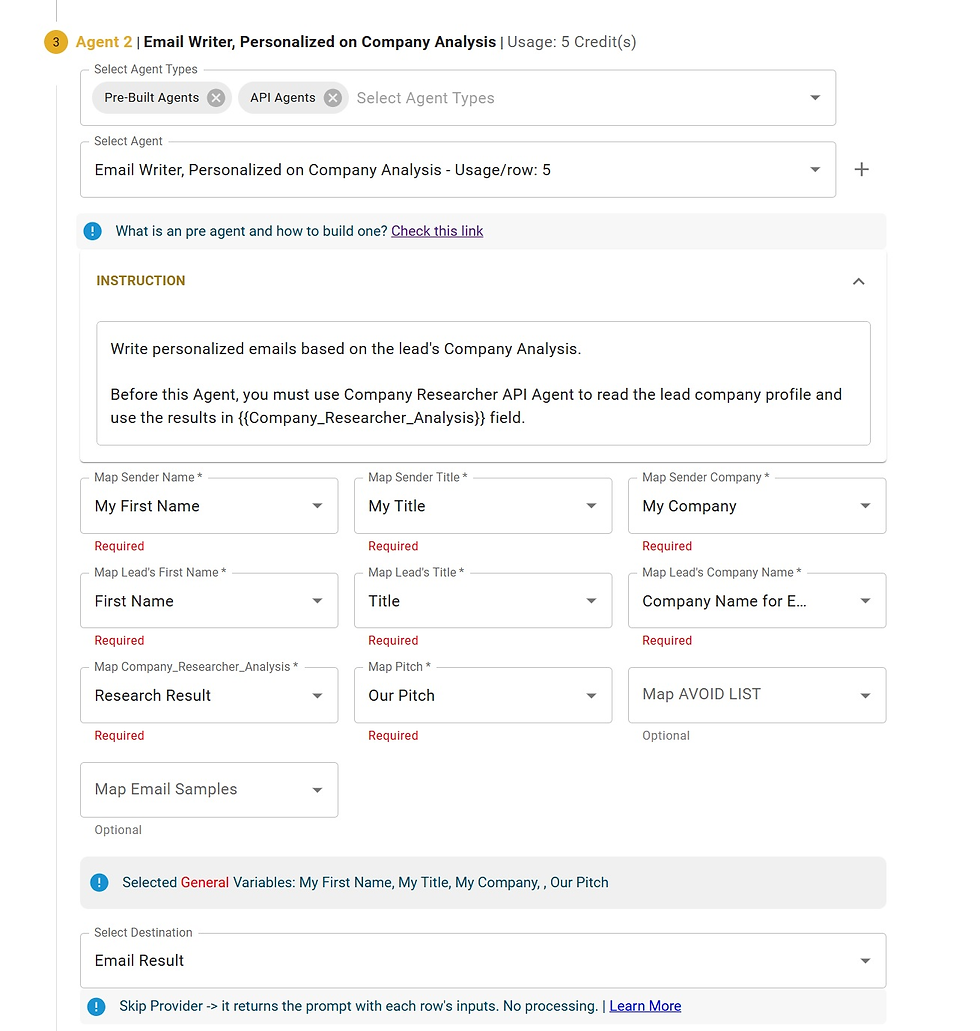
Select the Second Agent - "Email Writer, Personalized on Company Analysis":
Click the "Add Agent" button, then "Next". From the list of Agents, select "Email Writer, Personalized on Company Analysis" as your second agent in this workflow.
This agent will generate personalized emails based on the lead's Company Analysis and your campaign’s pitch.
Map the lead-specific inputs, such as "Lead's First Name" or "Company Name." Map inputs related to your information to the variables created in Step 1 of this tutorial.
In the destination drop-down, select "Add a column" and name it "Email Results" for the generated emails. The "Avoid List" and "Email Samples" are optional inputs; you can add these in future runs for enhanced results:
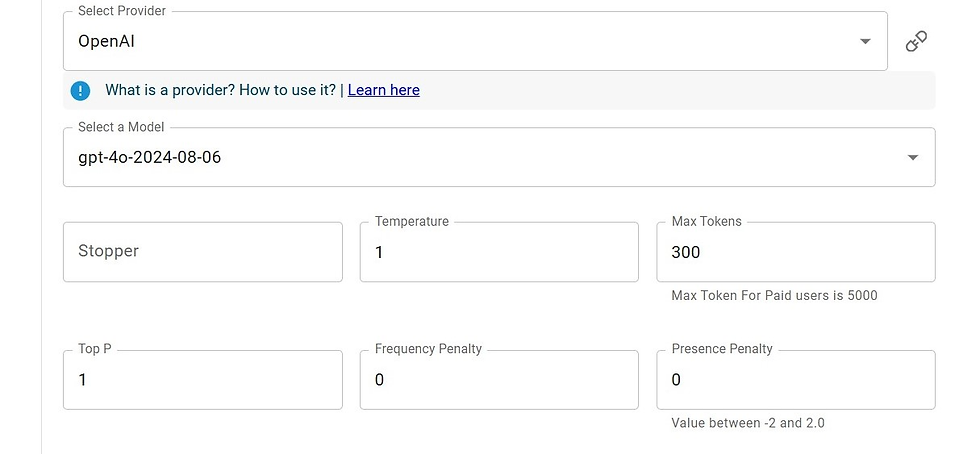
This agent requires you to specify an AI provider. Here, select OpenAI, which you set up in the previous step. For the model, "gpt-4o-2024-08-06" is recommended. Leave the parameters as default in your first project:
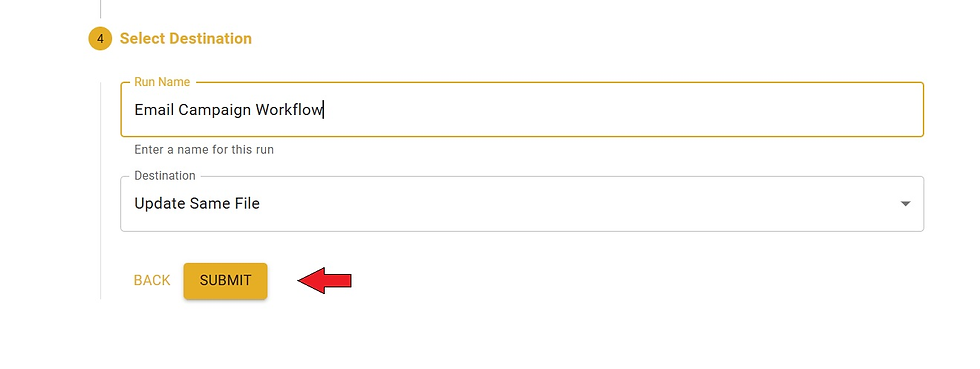
Name and Submit Your Project:
Give your project a name and click Submit. Your results will be ready in 2-3 minutes.
You have successfully implemented your first personalized project inside Personize Studio!
Step 3: Reviewing and Re-running Projects
To run your project on the entire dataset, first review the initial outputs for a few records to ensure they meet your standards.
Review Initial Results:
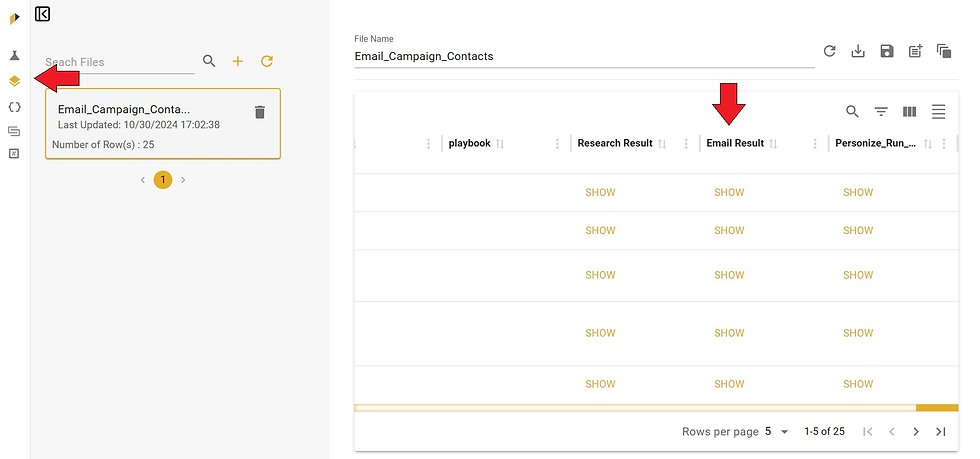
Open your data in Personize by clicking on the Data Layer button, then selecting your file.
Locate the generated results under the column you named "Email Results."
Identify ways to improve results (e.g., adding inputs like "Avoid List" or "Sample Emails," changing the provider model, etc.).
Update variables as needed and re-run the project on a larger range of records to cover more data.
After making adjustments, go to the Run page, click Re-Run on your previous run, and execute the workflow for the remaining records.

2. Follow the "Run Optimization Framework":
The "Run Optimization Framework" (1-10-20-100-500-1000) involves progressively testing with increasing row counts. Start by running your workflow for one row, check the results, then increase to 10 rows, reviewing each set until you are satisfied with the outcome. Once optimized, re-run the workflow for the full dataset. This framework is recommended to ensure your data processing in Personize Studio is both efficient and reliable. By testing and refining your agents, you can achieve consistent, high-quality results.
For more information on Run Optimization Framework, refer to this document:
3. Download the File:
Once satisfied with the results, download the final output by clicking Export on your data.
Congratulation! You have successfully implemented and refined your first personalized project in Personize Studio!
Note: For custom agents tailored to your domain, contact us for specialized researchers and email writers.
Get Started Now: Follow these steps to see how Personize.ai can simplify your campaigns in minutes. For further assistance, feel free to reach out!